25 Hacks for Your Next Outdoor Adventure
Updated by Brandon F. on December 22, 2022
While we all love enjoying the great outdoors, trying to account for all of the necessary items one may need can be very cumbersome. Between needing a small army to carry all of the gear and spending a fortune on buying the latest items, trying to experience the Great Outdoors without issue can be quite challenging.
To help with this, we have put together a list of some of our favorite hacks and tips that will not only make your next excursion much simpler but also save you some money in the process.
1. Make an Improvised Lantern
Save some money on buying an expensive lantern and make on with some easy-to-source household items. While we still recommend having an actual lantern due to its reliability and improved performance, a homemade lantern can work in a pinch. Our friends at survivallife.com wrote a simple article that shows you how to make a lantern with nothing more than a bottle, an aluminum can, a cotton t-shirt, and some kerosene. You can read more about their process here.
2. Find North Without a Compass
There are several ways to figure out which way is north without relying on a compass.
Using an Analog Watch
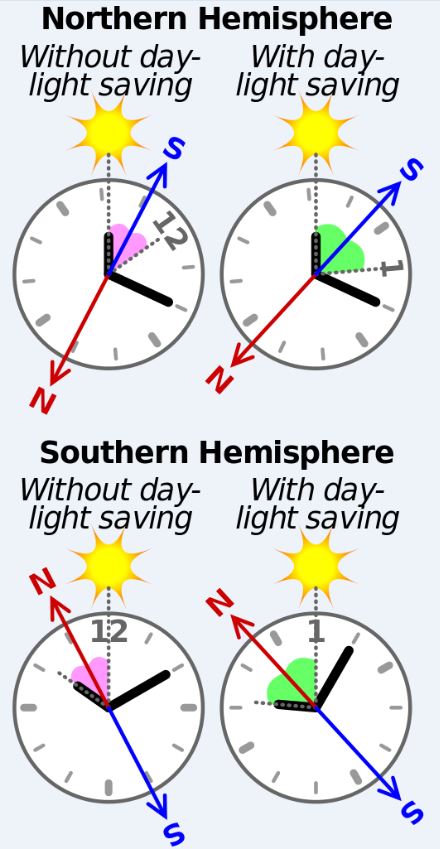
If in the northern hemisphere, point the hour hand at the sun. Next, picture a line down the middle of the angle that is formed between the hour hand and the noon mark. The line down the middle of the angle is pointing to the south and the line pointing in the opposite direction is pointing to the north.
If you live in the southern hemisphere, point to the noon mark at the sun. Next, picture a line down the middle of the angle that forms between the noon mark and the hour hand. The line down the middle of the angle is pointing to the north.
Using Shadows
Grab a twig or stick and wedge it into the ground upright so that you can see its shadow. Next, mark the ground at the edge of the shadow tip. Wait about 15 minutes and make another mark at the new location of the shadow tip. Finally, make a line that connects these two marks. This line represents a west-to-east line. From here, you can easily determine north and south by drawing lines perpendicular to this.
Two Stick Method
If it is nighttime, grab two sticks of differing heights. Stick them in the ground, with the smaller stick closer to you and the larger stick farther away. Line them up so that they point towards a large, bright star. Wait a few minutes and observe the star again relative to the sticks. If the star has moved up you are facing east. If it has moved down you are facing west. If it has moved right you are facing south. If it has moved left you are facing south.
Magnetize Needle Method
Grab a needle and magnetize it by rubbing the eye against your hair or a thick wool fabric. Next, grab a leaf that can float in calm water and rest the needle on top of the leaf. The magnetized needle will rotate the leaf and point it in the north direction.
Look for the North Star

Probably the most tried and true method, being able to find the North Star is a great way to know which direction is north. To find the North Star, search for the Big Dipper and then locate the stars farthest from the end of the handle. Draw an imaginary line through these and it will point straight at the North Star (Polaris). Another easy way to identify it is to simply look for the last star of the handle in the Little Dipper.
3. Deal with blisters
Blisters can be a nuisance on the trail and can lead to painful travel if not taken care of properly. Follow these simple steps to minimize the pain that they cause and speed up healing and recovery.
A. If you find yourself having a blister, go ahead and pop it. But do so with care! First, grab a sharp pin or needle and sterilize the tip with rubbing alcohol. Pierce the edge of the blister as opposed to the middle. Once the seal is broken, carefully push out the fluid until the blister is drained.
B. Once ruptured, clean the surface with some soap and water and then run it over with some antiseptic. Yes, it may burn but it is a small price to pay to help avoid infection.
C. If you have some adhesive hydrogel material, now is the time to use it. While it won’t necessarily speed up the recovery, it greatly helps with minimizing irritation.
D. Finally, try to keep the punctured blister slightly moist with ointment as this helps in speeding up the recovery.
4. Fix broken eyeglasses with fishing line
Misplacing the small screw that holds the frame of glasses together can quickly spell disaster. However, all you need for a quick fix is some fishing line and a lighter. Make a knot on one end of the line and feed it through the small screw hole. On the other end, make another small knot. Finally, get out your lighter and run it across the filament. The heat should melt it and create a rivet that will hold the fishing line in place.
5. Keep Warm in a Sleeping Bag
If you happen to find yourself in abnormally cold conditions without proper heat sources, the first thing you would think to do is wrap yourself up in every layer of clothing you have and bundle up in your sleeping bag. However, you are better off stripping down to minimal clothes before you get in your sleeping bag (assuming you have a proper sleeping bag).
Your primary source of heat is the heat that your body produces. If you are wearing a dozen layers, that is just more surface area that your body has to work on getting warm. By minimizing layers, you have much less surface area and your body heat will go much farther.
Also, once bundled up, you are likely to sweat and this will get your clothing wet. Wet clothing + cold weather can spell disaster so it is important to have some spare dry clothes to swap out into in the morning.
6. Use Your Belt
Most people think of their belt as simply something that holds your pants up. But in the outdoors, your belt can be a very valuable tool in a pinch. It is a great way to bundle and hold together stacks of wood for carrying. It can also be an excellent makeshift strap for holding a tent or shelter together during a storm.
7. Start a Fire with your Boots
We have all seen someone start a fire by simply rubbing two sticks together. However, those who have tried it, quickly realized how laborious the process is. A trick for making it much easier is to wrap rope or string around the bow and “spin” the round bow by sliding the rope back and forth. A great rope-like material that people often forget that they have is their shoelaces! Simply take off your shoelaces, wrap them around the bow, and you have a sturdy and reliable makeshift rope to help you start a fire.
8. Need a Firestarter? Think with your Belly.

It can be challenging to get a fire started. In damp conditions with large pieces of wood, having some sort of high-temperature catalyst or Firestarter is essential. But what do you do if you didn’t happen to bring a starter log and can’t find any dry brush in the woods? Open up your food supply and look for some high-calorie foods. Things such as chips or crackers can make an excellent Firestarter (just make sure you have some extra for eating!). Calories are essentially a unit of stored energy so the more calories a food item has, the more stored energy it has for you to tap into.
9. Make your own stove/candle
There are several ways to make a stove or candle on the fly. One of our favorite ways is to grab the base of a metal can, fill it with cardboard or some other type of flammable material, and then fill the top (above the cardboard) with melted wax until only a small portion of the underlying cardboard is exposed. The small opening allows for very little oxygen to get in which helps to control the amount of cardboard that burns at one time while also helping to retain the heat.
10. Make AAA batteries work in AA Slots
While there can be a difference in voltage requirements, a AAA can be modified to fit into AA slots while in a pinch. First, wrap the AAA battery in paper, tape, or cardboard until it is roughly the same diameter as the larger AA battery. Next, stack aluminum foil or coins on the top and bottom of the battery to increase the overall length. Since you are using metal, the power will still be able to be transferred through the battery.
11. Duct Tape Turned into Snow Goggles
If you find yourself in a sudden snowstorm, being able to properly see can be a real challenge. If you don’t have access to goggles, you can quickly throw together some makeshift snow goggles using nothing more than duct tape. First, stack several layers of duct tape of equal length together (roughly the circumference of your head near your ears).
Make sure to have the sticky ends pointing toward each other. Once it is a few layers thick, grab your knife and cut some small slots into the tape (approximately half an inch thick). Finally, wrap it around your ears. You may look like a ninja turtle, but the small slots limit how much light can get it and will make it much easier to be able to see out into the snow.
12. Mark your Tracks
This is an easy one to forget but it can be essential if you plan on going deep into the woods. Bring a piece of charcoal or other writing device and make arrows on trees every few hundred yards. This not only provides a “breadcrumb” trail for you to backtrack but it also provides a vital tracking method for rescuers to find you in the unfortunate event that you are hurt and unable to return on your power.
13. Bring Something Shiny

While bringing a mirror may be the last thing that outdoorsmen and outdoorswomen are thinking about when planning an excursion, you should still pack one. This isn’t for vanity purposes but rather as a method of signaling. If you find yourself trapped and/or lost, using the reflective ability of a mirror can help you to signal and alert others of your specific location.
14. Keep Bugs at Bay with Smoke

Bugs can be a huge nuisance in the outdoors, particularly if you have food out. A good way to keep them away is through the smoke. If you live near wetlands, you can likely find some cattail plants. Pull off the cotton-like head of the cattail and light it on fire. It will begin to smoke heavily and provide excellent smoke to ward off any curious insects.
If you can’t find cattail, simply use any sort of flammable brush and enclose most of it in a fire-proof wall such as wax or metal. The lack of oxygen should help minimize the likelihood of flames starting but still provide enough oxygen to allow for smoke to form.
15. Dry Your Boots the Proper Way
Caught in a sudden rainstorm? Or did you have to wade through a creek? Soaked boots can be a nuisance and, in cold conditions, can be a dangerous game that can lead to frostbite and/or hypothermia. When drying them, don’t simply lay them near a fire. This can cause the leather to dry and crack. Rather, warm up some nearby rocks and lay them inside the boot. The warmth of the rocks will help to dry the boots without harming them in the way that an open flame does.
16. Create a Large Lantern with Just a Headlamp and a Water Jug
To create a large lantern that can light up an entire tent, grab your headlamp and wrap it around a water jug filled with water or other clear liquid. The light will refract and spread out and create a great ambient light source.
17. Create a Mobile-Friendly Tin Can Bread Loaf
This original approach not only is a handy way to make bread but the bread is also well-protected from outside elements. This is a perfect way to bring fragile bread on your camping trip without worrying about it getting squashed.
18. Avoid Ticks
Ticks can be a sneaky nuisance and can also potentially carry dangerous diseases. An easy way to keep them away is to spray your exposed areas with a tick deterrent. You can buy this stuff in stores for a huge markup but an easy solution is to mix 1 part tree oil with 2 parts water. Spray this concoction on your shoes, socks, and arms, and your tick problem should disappear.
19. Turn Any Matches into Strike Anywhere Matches
Finding a good surface for getting a match started can be challenging in outdoor conditions, particularly if it is wet. Rather than have to deal with the hassle, simply tape or glue some coarse sandpaper to the lid of your matchbox. This will give you an excellent surface to swipe a match.
20. Ice Without the Hassle

Instead of worrying about buying bags of ice, grab a few empty water jugs and fill them up with water and stick them in the freezer before you leave for your trip. After a few hours, you will have large “ice cubes” that will keep your items chilled for days.
21. Make Pocket sized Oil Lamps
Do you have any of those small shampoo bottles from hotels or airports laying around? Put them to good use! Read on the specifics here.
22. Wash your Clothes with a DIY Washing Machine
Simply scrubbing your clothes doesn’t always do the trick. With nothing more than a bucket and a plunger, you can make your washing machine. This can be very helpful for those who plan to be outdoors for long periods and need to reuse their clothing.
23. Make One-Time-Use Soaps from a Single Bar of Soap

Rather than have to keep up with a large soap bar, you can create single-use soaps that are much easier to transport and share. Grab a bar of your favorite soap as well as a cheese grater or slicer. Slice a thin strip of soap, in the same manner, you would slice cheese. These slices are perfect for single uses. To transport them, wrap each up in some Saran wrap. Read more about it here.
24. Make Single Use Toothpaste
Similar to single-use soaps, you can also do the same with toothpaste. Grab a couple of straws and cut them into small sections approximately an inch long. Get a lighter and heat one end and seal it shut. Next, fill the other end up with some toothpaste. Once you have a pea-sized amount of toothpaste inside the straw, seal the other side shut with the lighter.
25. Make an Easy Dispose Toilet Paper Dispenser
Toilet paper can be one of the most vital items on a trip. Let’s face it: using leaves and foliage just isn’t the same! A great way to protect the TP and also help to limit overuse is by making a mobile toilet paper dispenser. Simply get an old empty coffee can and cut a slot in the side of it that is approximately the same width as a toilet paper roll. Lay the TP inside of it and feed the start of the roll through the slot. Now you have a waterproof dispenser.